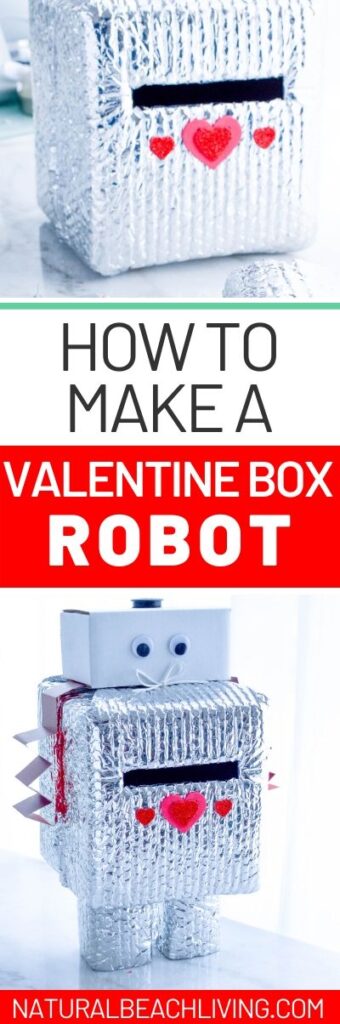
How to Make a Robot Valentine Box – Easy and Cute

Are you looking for a super cute Valentine’s Day Box that you can easily make with recycled materials? You’re going to love this DIY Robot Valentine Box! It’s simple, adorable, and just might steal the show!
Stop fretting over what to make for the class party or homeschool co-op that is right around the corner. Instead, let this valentine card box do all the talking for you!
Plus, it’s a great way to get some awesome bonding time in with your child, too!
Robot Valentine’s Day Box
Robot Valentine Box
As a parent, it’s stressful to try and find the perfect valentines boxes for school! We homeschool so it’s a little different, but we still like to make a Valentine box to exchange with friends.
The Valentine boxes at the store aren’t all that awesome and trying to find one online that you can easily make is a lot of work, too.
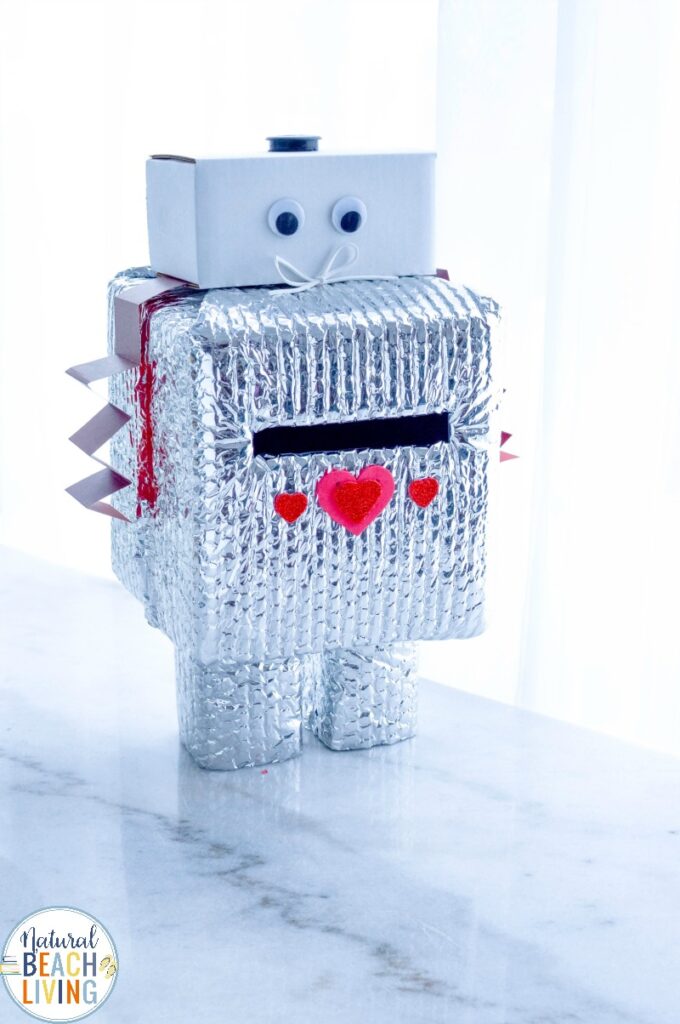
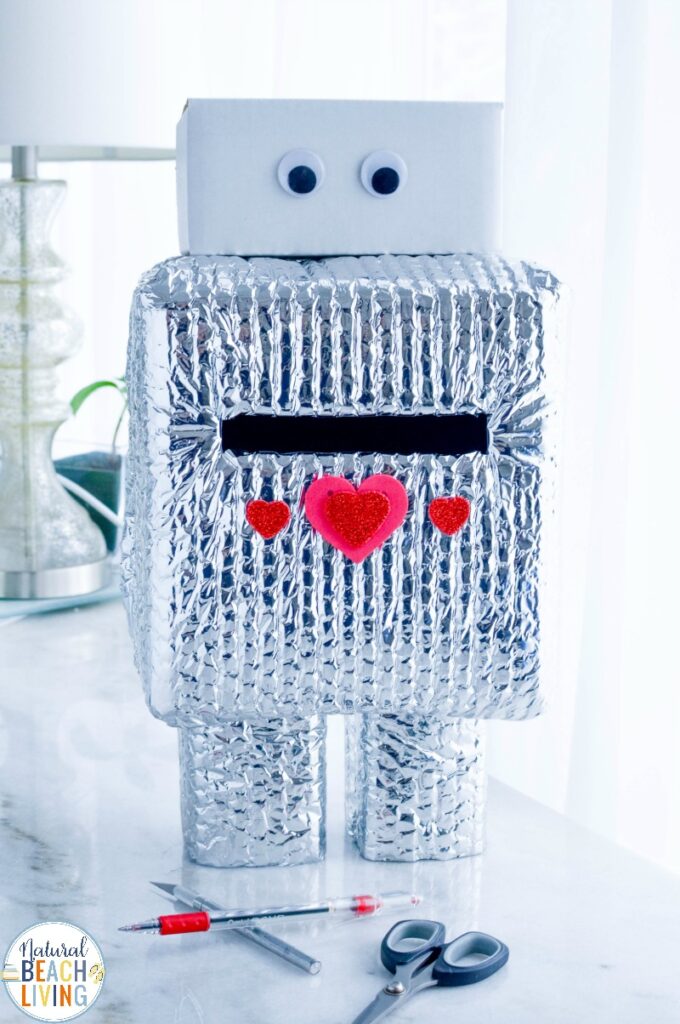
But this Robot Valentine Card Box is perfect and with just a few simple supplies that you probably have laying around the house, you can easily make one of the coolest homemade robots, ever!
It’s big enough to stand out and hold all those treats but small enough that your child can carry it into school on their own.
Robot Valentine Card Box
How do you make a Valentine robot?
A simple tip for you for making a Valentine robot is to keep those empty boxes (thank you Amazon Prime!) and silver paint, tin foil, or foil bubble wrap. Once you have those two main supplies, the rest of it is easy pease!
You’ll find the full list of detailed directions below.
DIY Robot Valentine Box
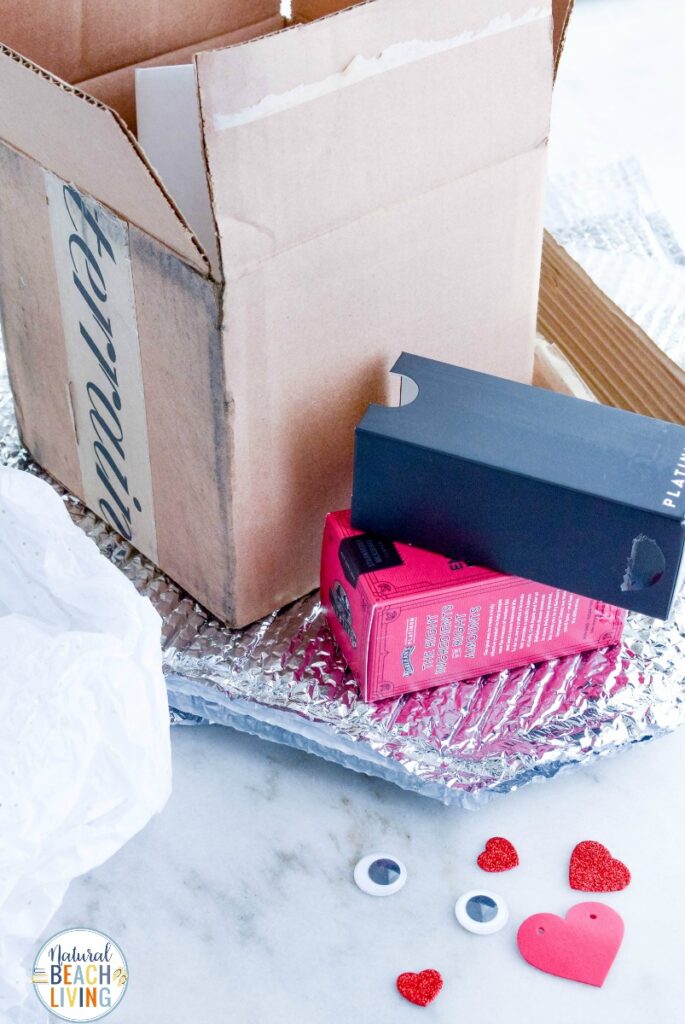
What you will need to make your DIY Robot Box is in this picture below. However, I have it displayed in a recipe list form to print out towards the bottom of the page. Have Fun!
How do you make a Valentine box?
It’s actually not hard to make a Valentine box. You can easily use recycled materials to make it happen. You just need a sturdy box, some fun decorations, a couple of googly eyes, sharp scissors, and some glue and/or tape, plus a few more items that you’ll see below.
And if you have creative minds in your house, you can easily use their imagination to make their visions become a reality. To make a robot, gather up the simple supplies below.
Supplies needed:
- One larger box, this one is about 8 in square
- Two smaller boxes that can be used for the legs, I cut these ones to be about 4 to 5 inches tall
- One roughly 5-inch box to be used for the head
- Either silver foil bubble wrap or tinfoil
- X-Acto knife or scissors
- Hot glue gun
Helpful supplies:
- A pair of 1-inch googly eyes
- Glittery heart-shaped stickers or cutouts and any other embellishments you would like
- A small circle piece, about 1 1/2 inches that can be used on top of the head box, I used the cap from our pepper grinder
- I used a little bow at the neck to embellish that area
- Red or pink paper, construction paper or card stock, both will work well
- Standard gift wrap tape
- A Marker
Valentine’s Day Box

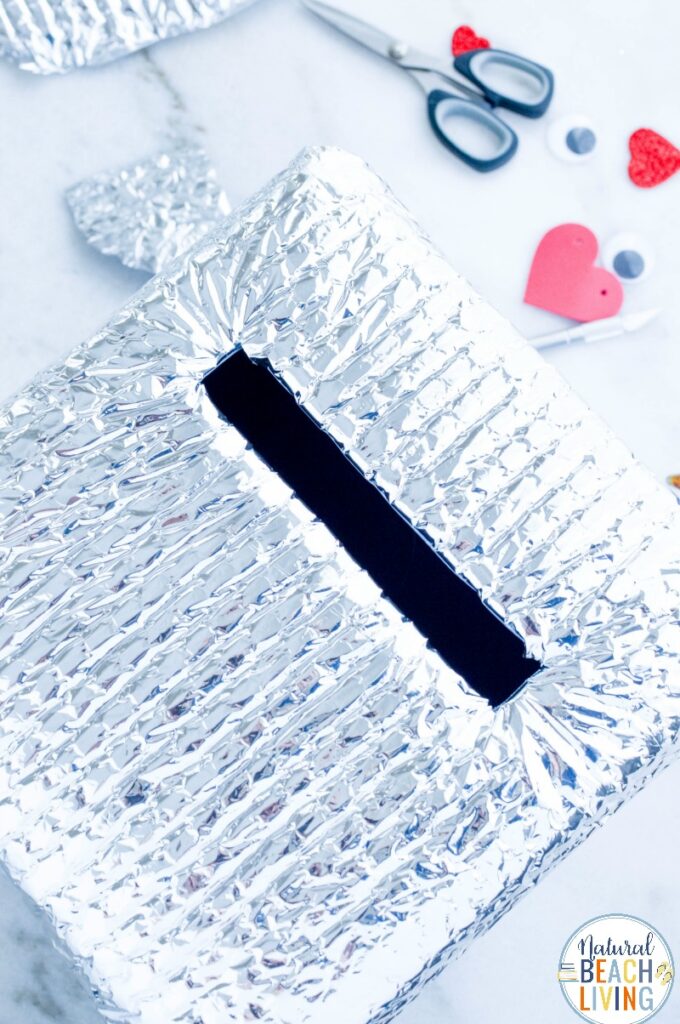
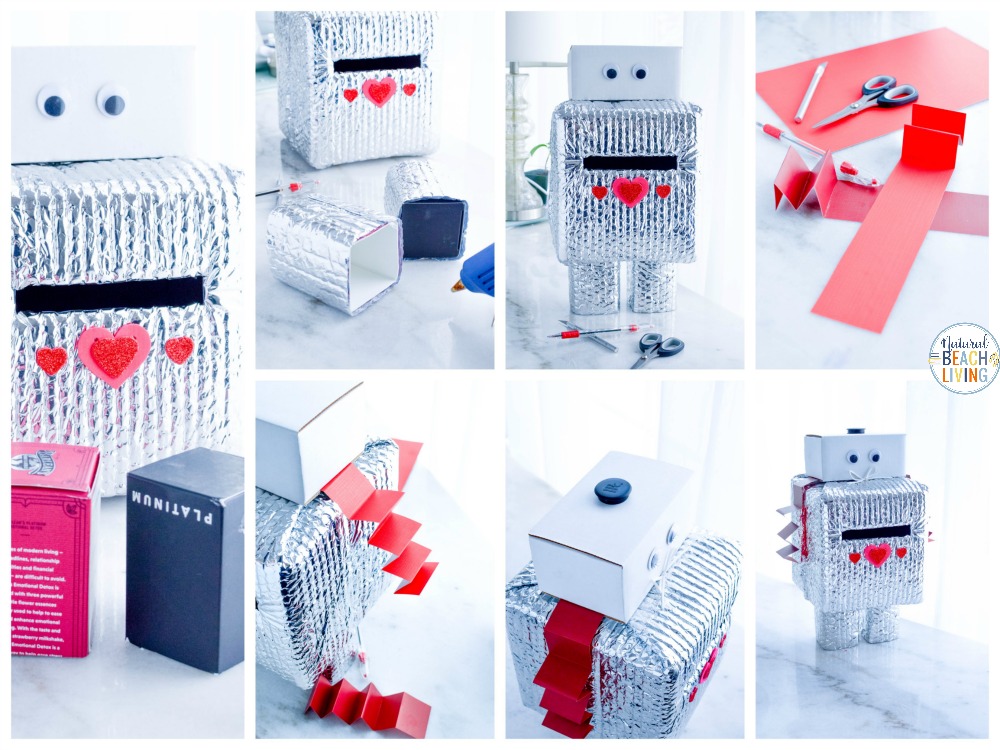
First, you’ll need to decide where you would like to make the cut out for the cards to be inserted on the body of the main box. (Make certain to make it long enough and wide enough for cards and treats!)
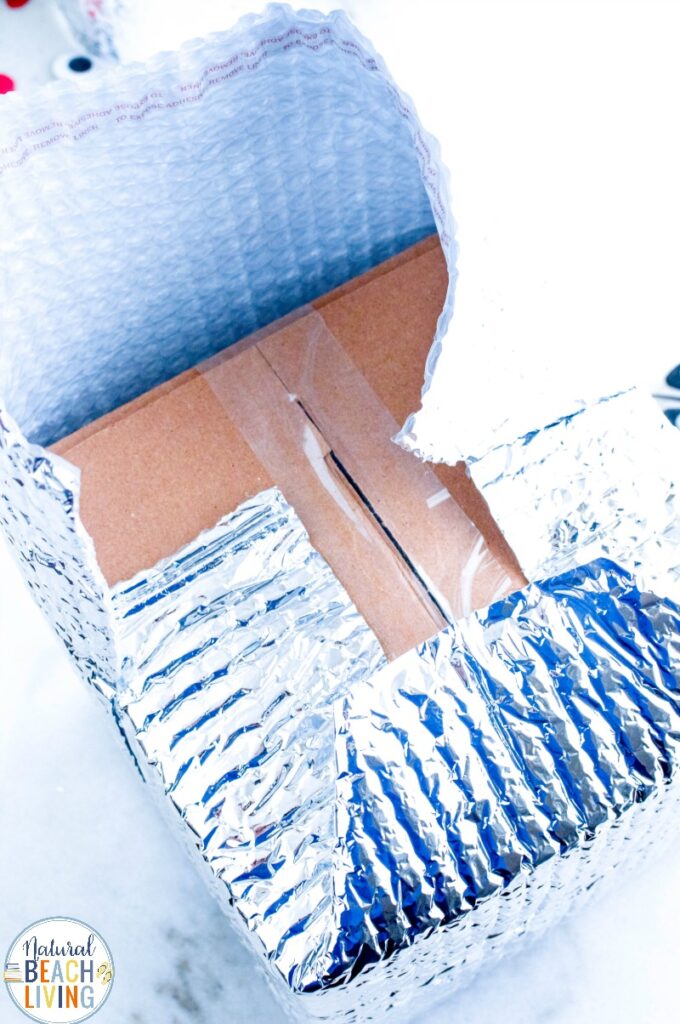
Once you have that decided, you’ll want to use the standard gift wrap tape as your guide and aim for the opening to be about 4 inches long to accommodate different sized envelopes. Cut the opening with scissors or an X-Acto knife carefully. (parental guidance needed for this portion!)
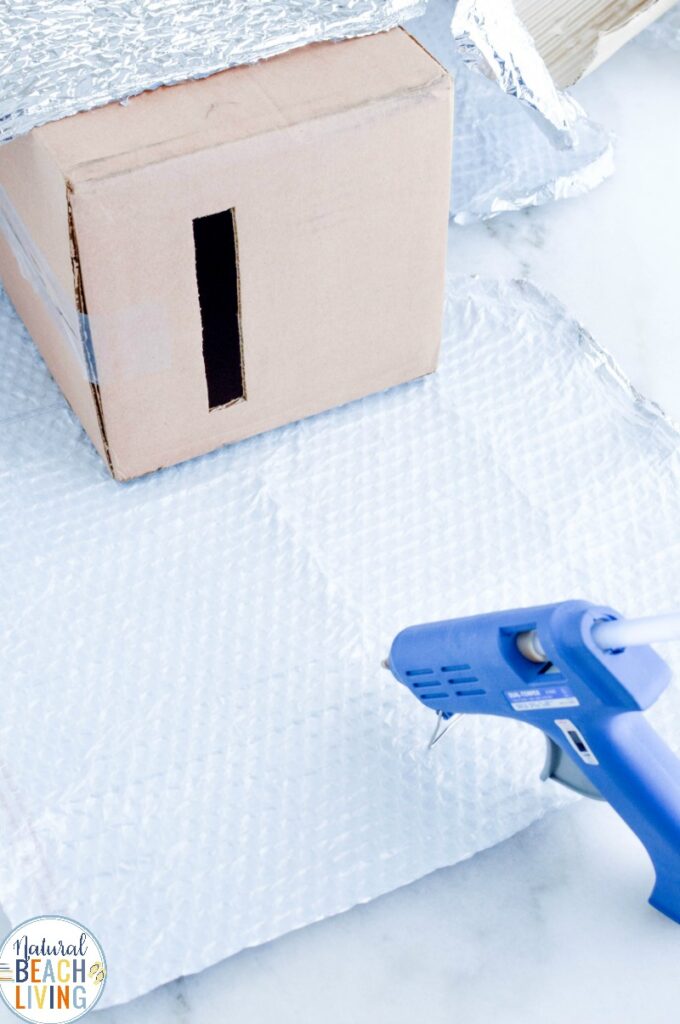
Before you start wrapping the box to create the body, make certain that you have enough to get it all the way around.
Valentine Boxes
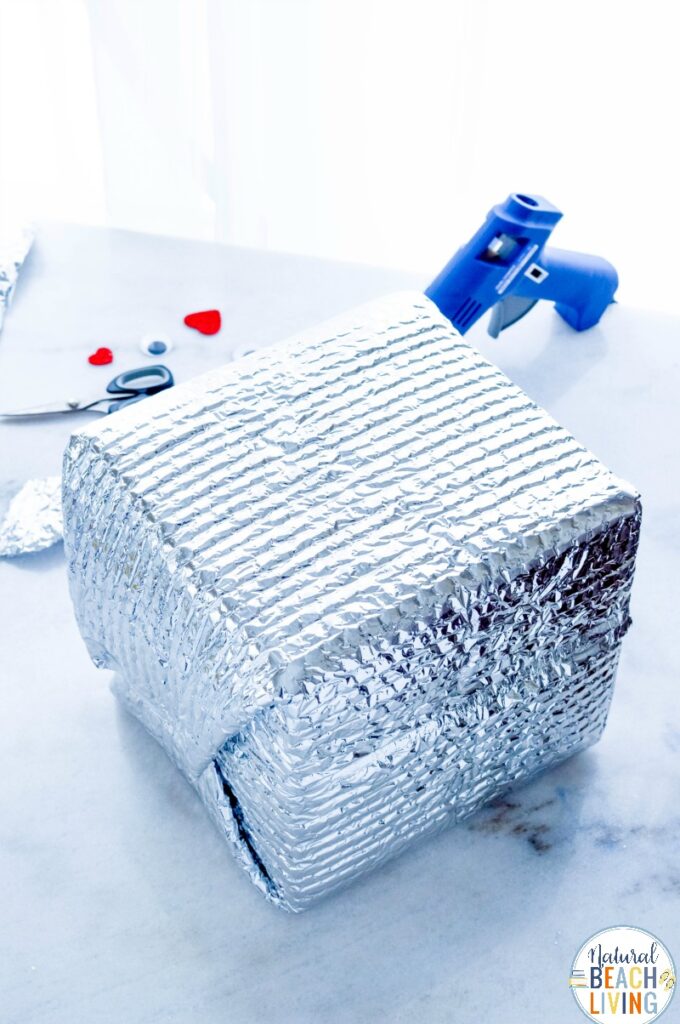
The easiest way to wrap the box is to think about how you would wrap a gift and use the foil as wrapping paper. Then use the hot glue gun to hold it in place. Just be careful not to burn your fingers!
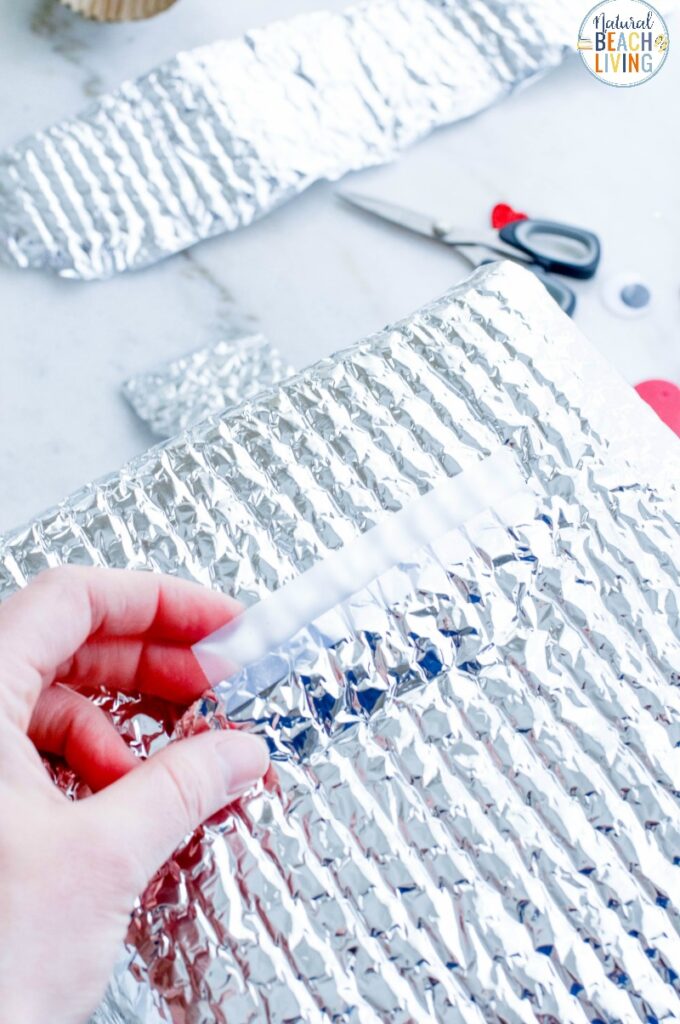
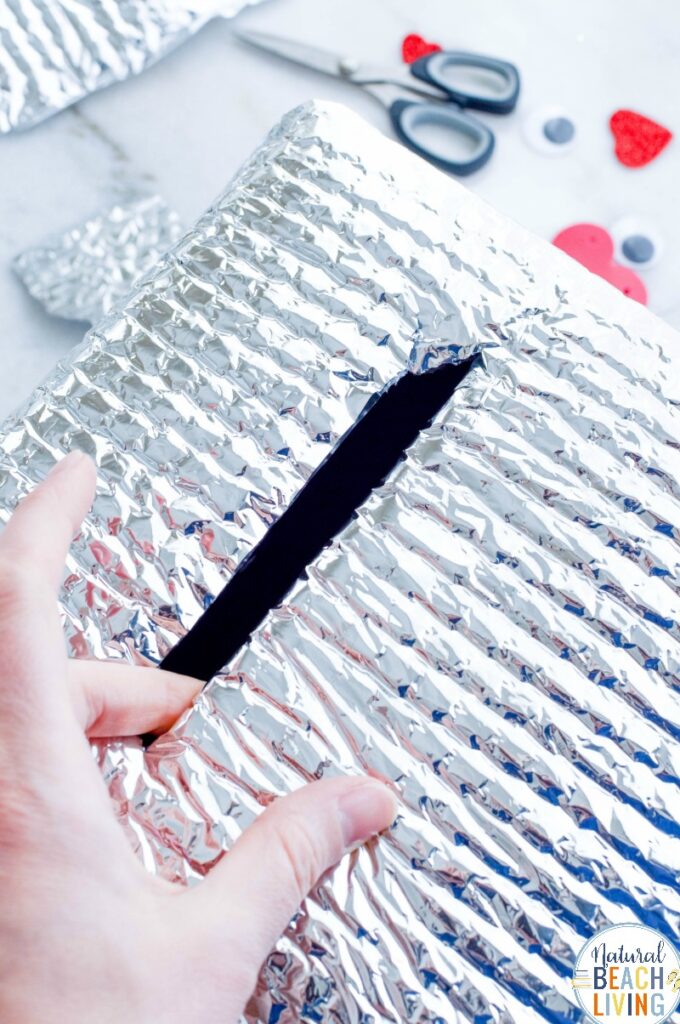
When the foil is secured in place and the hot glue has dried (this only takes a minute) use your fingers to feel for where the mail slot opening is and carefully cut the foil in a way that would allow you to fold and tape it back inside the box so you have a nice clean opening. If the tape does not seem to hold in place you could carefully hot glue here as well.
Now it’s time for the feet! Start by wrapping just the sides of each box, not the top or bottoms, that make contact with the body. This will help keep the box sturdy and prevent it from tipping over.
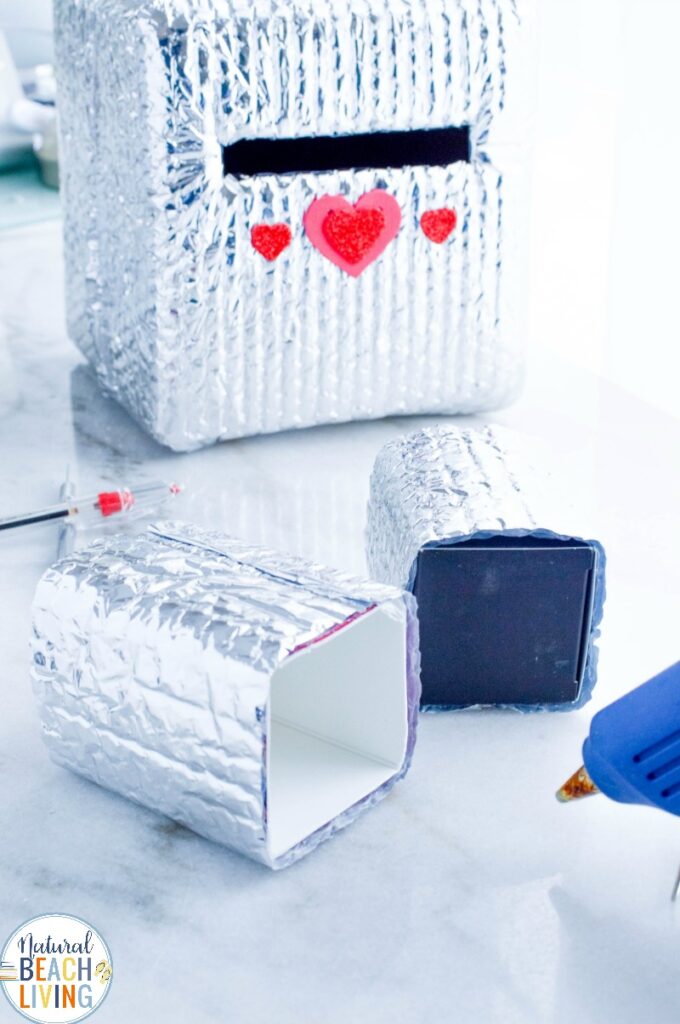
Then you’re going to hot glue the tops of the feet boxes to the bottom of the body. Quickly check that the robot is balanced can stand on its own, adjust the feet placement if needed.
Tip: if you are having a tough time getting the robot to stand still, you could try gluing the bottoms of the feet/boxes to a flat surface like a paper plate, lid…
Valentine box ideas for boys and girls
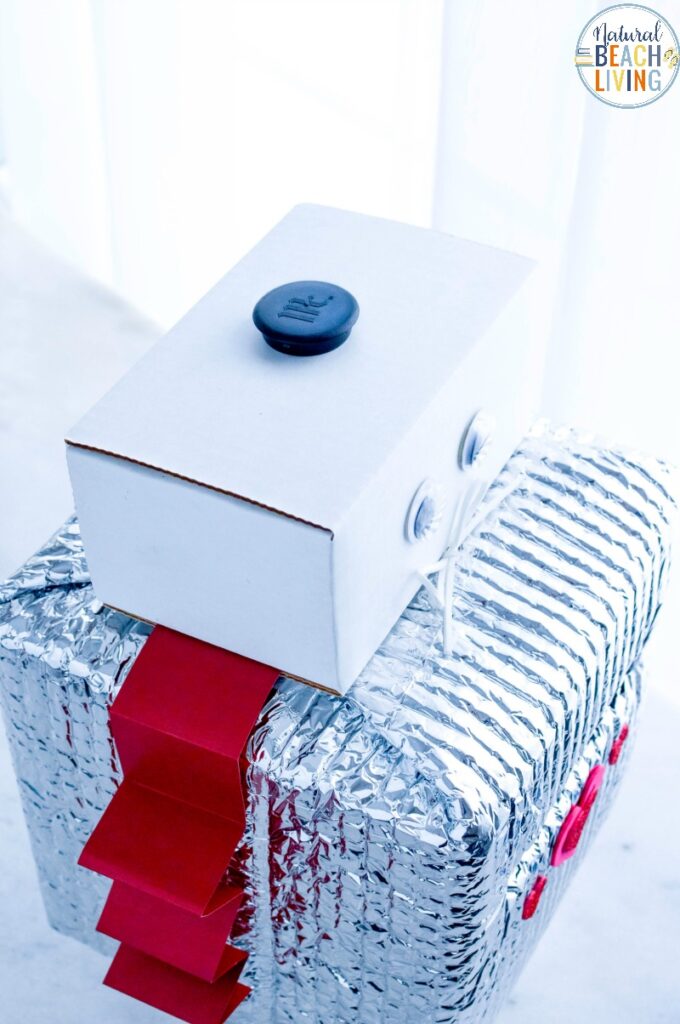
Now it’s time to hot glue on the following:
- Head
- Eyes
- Head cap
- Hearts
- Bow or other embellishments
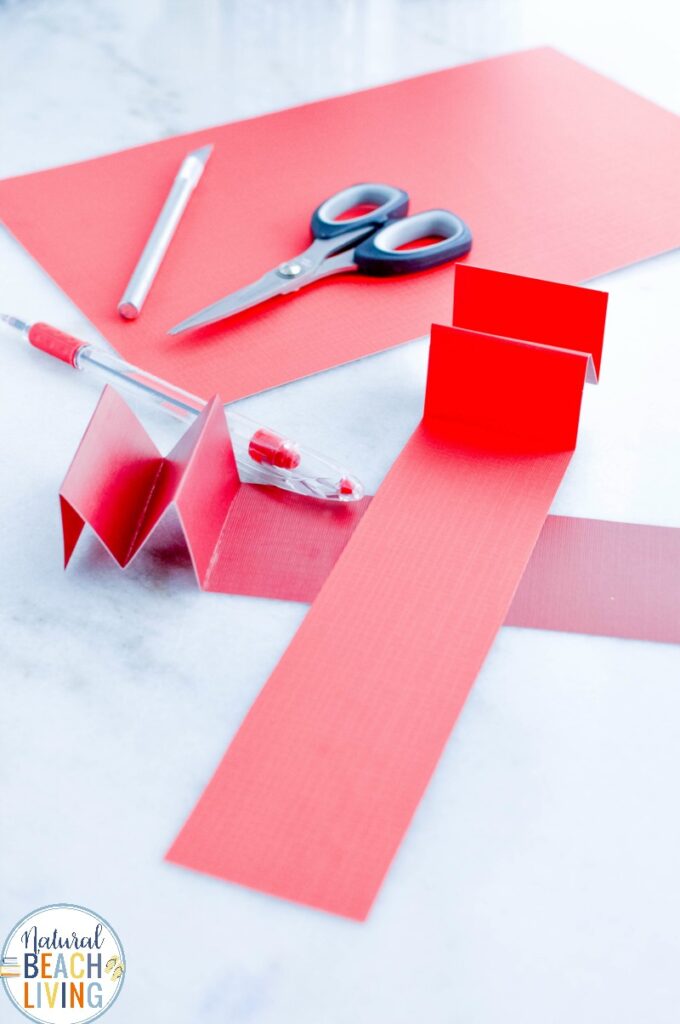
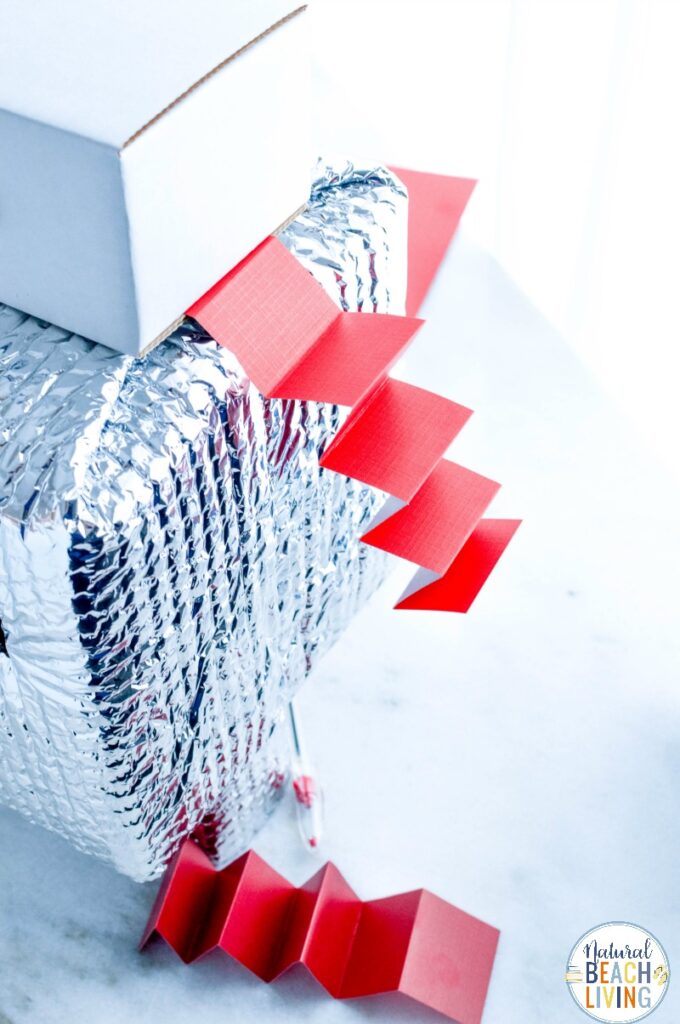
Cut 2-inch strips of the red paper for the two arms. Fold the paper alternating back and forth to create a zig-zag and then glue the arms into the space between the head and body of the boxes.
And just like that, you’ve created a robot!
Valentine Activities
Once you make this Valentine Box your kids will love these Valentine activities too.
PIN Robot Valentine Box Ideas For Later
Valentine Card Box
Valentine Box Ideas
Your kids can use a DIY Valentine Card box at school, homeschool co-op, or if you are throwing a Valentine’s Day party.
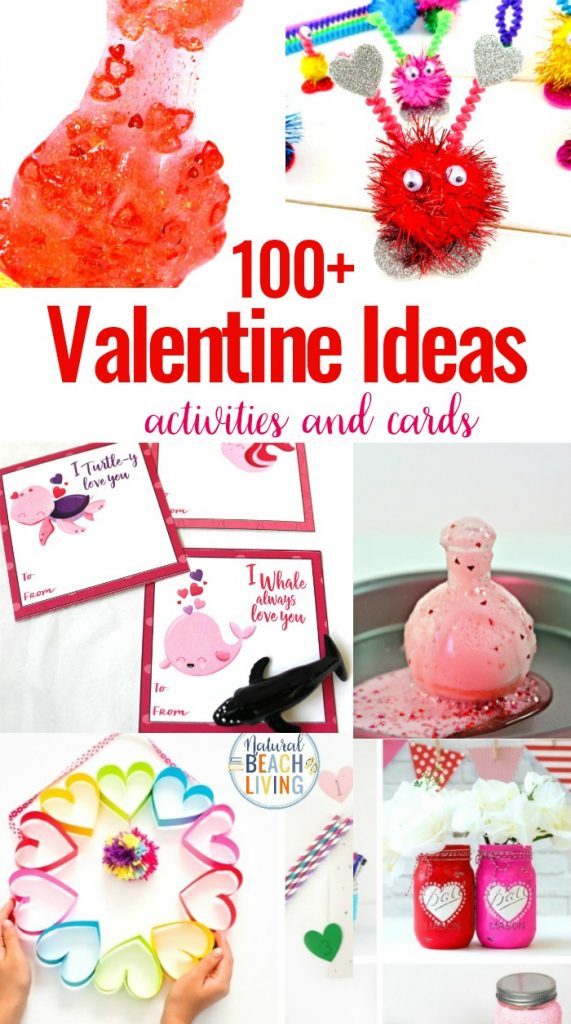
100+ Valentine’s Day Ideas and Activities for Kids
Studies have shown that you will also love the following ideas if you like them. I have pulled them together for you right here!
Robot Valentine Box Instructions

You're going to love creating this adorable DIY Robot Valentine Box!
- One larger box, this one is about 8 in square
- Two smaller boxes that can be used for the legs, I cut these ones to be about 4 to 5 inches tall
- One roughly 5-inch box to be used for the head
- Either silver foil bubble wrap or tinfoil
- X-Acto knife or scissors
- Hot glue gun
- A pair of 1-inch googly eyes
- Glittery heart-shaped stickers or cutouts and any other embellishments you would like
- A small circle piece, about 1 1/2 inches that can be used on top of the head box, I used the cap from our pepper grinder
- I used a little bow at the neck to embellish that area
- Red or pink paper, construction paper or card stock, both will work well
- Standard gift wrap tape
- Marker
-
First, you'll need to decide where you would like to make the cut out for the cards to be inserted on the body of the main box. (Make certain to make it long enough and wide enough for cards and treats!)
-
Once you have that decided, you'll want to use the standard gift wrap tape as your guide and aim for the opening to be about 4 inches long to accommodate different sized envelopes. Cut the opening with scissors or an X-Acto knife carefully. (parental guidance needed for this portion!)
-
Before you start wrapping the box to create the body, make certain that you have enough to get it all the way around.
-
The easiest way to wrap the box is to think about how you would wrap a gift and use the foil as wrapping paper. Then use the hot glue gun to hold it in place. Just be careful not to burn your fingers!
-
When the foil is secured in place and the hot glue has dried (this only takes a minute) use your fingers to feel for where the mail slot opening is and carefully cut the foil in a way that would allow you to fold and tape it back inside the box so you have a nice clean opening. If the tape does not seem to hold in place you could carefully hot glue here as well.
-
Now it's time for the feet! Start by wrapping just the sides of each box, not the top or bottoms, that make contact with the body. This will help keep the box sturdy and prevent it from tipping over.
-
Then you're going to hot glue the tops of the feet boxes to the bottom of the body. Quickly check that the robot is balanced can stand on its own, adjust the feet placement if needed.
Tip: if you are having a tough time getting the robot to stand still, you could try gluing the bottoms of the feet/boxes to a flat surface like a paper plate, lid…
-
Now it's time to hot glue on the following:
Head
Eyes
Head cap
Hearts
Bow or other embellishments
-
Cut 2-inch strips of the red paper for the two arms. Fold the paper alternating back and forth to create a zig-zag and then glue the arms into the space between the head and body of the boxes.
-
And just like that, you've created a robot!