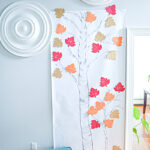
Gratitude Tree Craft for Kids and Adults
Gratitude Tree Craft for Kids, Adults, and even a classroom
Ingredients
- Paper or poster board
- Pencil
- Black markers in different sizes
- Painters tape
- Foam craft leaves
- These are the supplies we used. Adjust to what you have on hand and your preferences!
Instructions
-
I started with a long roll of white paper and sketched the outline of the tall birch tree. Your tree can be any style you like! Then I went back and traced over the pencil lines, making adjustments as I went along, with the different markers.
-
The smaller tree followed as I realized my younger child would likely not be able to reach most of the branches on the tall tree. I followed the same process for a smaller birch.
-
Cut the paper off the roll, fold the top and bottom over and then use painters tape to attach the tree to the wall. Your paint should stay perfectly safe and the paper won't budge, this is a favorite hack in our home! We attached the leaves with the painters' tape as well. This allows kiddos to easily move the leaves around when they want to.
-
Invite everyone in your family to write something each day that they’re thankful for, or have one happy gathering when you all sit down together and fill out all the leaves at one time, completely up to you!