Life cycle of a Butterfly Craft
An easy butterfly life cycle craft for kids
Ingredients
- White Paper Plate
- Yellow Craft Paint
- Brown Pipe Cleaner
- Mini Clothespin
- Small Stick
- Tiny Poms
- Green Paper small piece
- Tissue Paper light green and pink
- White Sixlets
- Glue Stick
- Black Marker
Instructions
-
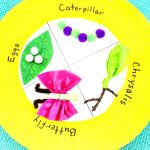
Paint the entire outer ridge of the inside of the paper plate. Leave the flat middle part white. Let dry.
-
For the chrysalis: cut a small square of the green tissue paper and form it into a cocoon shape over one end of the stick. Twist it closed around the stick.
-
For the butterfly: cut a small square of pink tissue paper, pinch together in a fan style, and clip the clothespin on it to hold it in place. Make sure each side of the paper is equal and fans out like wings. Cut a small piece of pipe cleaner, fold it in half, and clip the clothespin to it so it looks like an antenna.
-
For the eggs: cut out a small leaf from the green paper and draw some lines on it to resemble leaf veins. Glue the sixlets in the middle of the leaf.
-
Once your plate is dry, draw 2 black lines on the flat white part to have 4 equal sections.
-
Glue the leaf onto one of the sections. Glue the six poms on another section to look like a caterpillar. Glue the cocoon onto another section and glue the butterfly onto the last section.
-
Use a marker to write the life cycle names above each life cycle section: Write eggs above the leaf, write caterpillar above the caterpillar, write cocoon above the cocoon, and write butterfly above the butterfly.
-
Optional: If you can't get sixlets or prefer something else, you can use small white pompoms for the eggs.