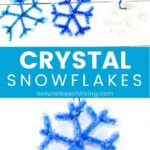
Crystal Snowflake Ornaments
Easy Winter Science Crystal Snowflakes Ornaments
Ingredients
- ¾ cup Borax
- 4 cups Boiling Water
- 3 Pencils
- String
- 9 Pipe Cleaners white and blue
Instructions
-
Boil 4 cups of water and pour into a glass measuring cup or bowl. Mix in the borax until it’s dissolved. Make sure the glass container is deep and wide enough so the snowflakes won’t touch the bottom or each other.
-
To make one snowflake: Cut 3 pieces of pipe cleaner 3-inches long. Cut 6 pieces about 2-inches long. Twist the 3 longer pieces together at the center so you have 6 arms sticking out evenly spaced. Take one of the smaller pieces and twist it around the end of one of the arms, so each end sticks out. Repeat that using the other 5 pieces. It should look like a snowflake now.
-
Repeat step 2 for the other 2 snowflakes.
-
Now tie a piece of string loosely to the end of one snowflake arm on each snowflake. Wrap the other ends of each string around each one of the pencils, so the snowflakes are hanging about 2 inches from the pencils.
-
Set the pencils on top of your glass container and dangle the snowflakes down into the borax water. Make sure they are fully submerged in the water and that they don’t touch each other or the sides of the container (a little bit is ok).
-
Leave it in the borax solution overnight so the crystals will grow on the pipe cleaners.
-
Remove them from the water when they are full of crystals. Cut off the strings from the pencils and lay the snowflakes on paper towels. Tie a new piece of string on each snowflake for your hanger and hang on the tree or use for any craft.
-
Fun Science experiment and holiday craft for the kids!