- 1 long board that was 8 feet long 10 inches wide, 2 inches thick. It is important to use a thick and very sturdy board for the counter surface so it can easily hold the weight that will go on it without bowing.
- 2 boards that were about 10 inches long 6 inches wide and 2 inches thick, these boards will help support and hold up the long counter board.
- 12 screws that are 3.5 to 4 inches long ideally stainless steel or another metal that will not rust. That will allow you to easily adjust the height over time or remove if needed.
- Level
- Screw gun with a bit that matches your screws.
- We did not need to drill pilot holes but you may need to depending on the strength of your drill, hardness of the wood and trees, ect
- Saw to cut the boards to length if needed.
- Sand paper
-
To install:
-
Measure the height you feel is the best height for your child or children, think about finding a middle spot that works for as many as possible. Also take into consideration how quickly children grow and plan for a little wiggle room so you hopefully wont need to change the height next summer.
-
Sand the boards all down to ensure there are no splinters in the kitchen.
-
Measure and mark the trees for the two short boards that will hold and support the counter.
-
Add the boards one at a time and double check to make sure they are level - both on the tree AND with each other.
-
Rest the long counter board on top of the two mounted boards, again check that the counter is level, adjust one of the boards mounted to the trees if needed.
-
Screw the long counter board onto the two sort boards and/or into the tree.
The steps and supplies for this project are all flexible based on the location you’ll be building the mud kitchen counter, the size you would like yours to be and the materials you have on hand. Below we’ll lay out how we made our exact set up. We used wood we happened to already have in the garage leftover from another project. This wood was not pressure treated, we were alright with that where there was no out of pocket expense for the project.
We started with a blank area in the backyard and quickly realized our children were most interested in using found items that were all around them in nature and mixing up fantastic mud cakes that were decorated with flowers and pinecones.
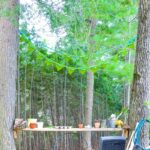
The DIY Science Table - Mud kitchen was created with two large fir trees that were about 8 feet apart at the height we placed the counter.
We spent way more time talking about the plans and choosing the trees than it took to mount the counter. Our children immediately brought over supplies and started playing and haven’t stopped!
We have also added in logs, rocks, and crystals we’ve found, slices of wood from a few trees that came down in the neighborhood, pinecones, acorns, and a hook with a hose that they can pretend to fill up with water when the rain bucket is empty.