Easy Disney Cars Rice Krispie Treats
Everyone Will Love These Easy to Make Disney Cars Rice Krispie Treats perfect for your next Cars Party Theme.
Ingredients
- 1 pkg. 8 count Rice Krispy Treats
- 1 pkg. Mini Oreos
- Wilton Chocolate Candy Discs Yellow, Brown and Red
- 1 pkg. M&M’s
- 1 pkg. Gum white small rectangles
- 2- Airheads Candy white mystery flavor individual size
Instructions
-
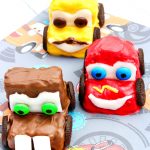
Lay 3 whole Rice Krispy Treats on a parchment lined baking sheet. Cut another one into a half piece treat and two others into third-size treats and lay each on the tray with the whole treats. You now have 3 sets of treats.
-
In 3 separate bowls, melt each color of chocolate. Heat for 30 seconds at a time, stirring between times, until completely melted.
-
Dip the first set of treats with a whole piece and the half piece into the brown chocolate, completely coat. This set will be Mater. Set the smaller piece on top of the whole piece to resemble a car windshield. Repeat this step with each of the other sets and each color of chocolate. These will be Lightening McQueen and Luigi.
-
Using the Airheads candy, cut 3 windshields to fit onto the cars. I made mine rectangle with little cut outs at the top to resemble the Cars characters. Press these on each car.
-
Cut a mouth out of the candy for the red and yellow car. Press this on the bottom piece of the car where the bumper would be.
-
Pull apart the Oreo cookies, and press 4 on each car. Use green, blue, and brown M&M’s for the eyes. Put a dab of melted chocolate on the backs and press on the windshields.
-
On the brown truck, put a line of chocolate on the bottom piece and place 2 gum teeth where the bumper would be. You could also use mini marshmallows.
-
Extra optional steps are: pipe a line of chocolate on the yellow car over his mouth to resemble a moustache. Use an edible marker to put black dots on the eyes.
-
Have fun making and eating Lightning McQueen, Luigi, and Mater!